Getting Started with the AI Art Shop® Platform - Guide for AI Artists
Getting Started
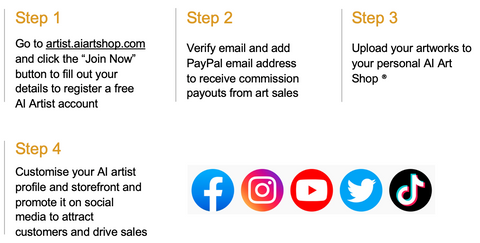
Our platform allows anyone to become an AI Artist! No matter your background - artists can get started on the platform in 4 easy steps in under 10 mins.

1. Dashboard
1.1 Dashboard – provides a snapshot overview of the various key store statistics such as sales and earnings as well as top products sold and any recent orders.

2. Adding your first AI artwork
2.1 Hover over the “Products” dropdown menu and then click on “Products Listing”.

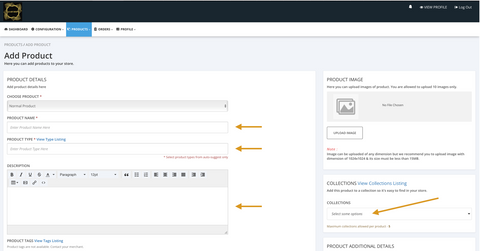
2.2 Next click the “Add Product” button.

2.3 You can upload your AI artwork in the ”Product Image” section on the right by clicking on the “Upload Image” button.

2.4 Next input your artwork name in the “Product Name” field.
2.5 Place the cursor in the ”Product Type” field and select the theme that best describes the artistic style of your artwork.
2.6 Write a brief description describing your artwork. Note that this is step is rather important as there are thousands of artworks on the platform so why should the customer choose to purchase yours? Writing a good artwork description is all about coming up with a compelling and captivating story – remember you are selling the name and description of the artwork as much as the artwork itself.
2.7 On the right, under “Collections” select “Art by AI Artists” – this will include your artwork in the general art collection on the front end of the website.

2.8 On the right hand side, in the “Product Additional Details” section input the title of your artwork that you want to be shown on Google and other search engines into the title tag meta field (good to keep this at no more than 70 characters).
2.9 Also, in the same section, add a short description of your artwork (no more than 300 characters) to enable it to be indexed by search engines.

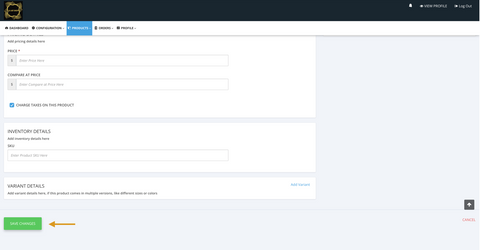
2.10 In the “Pricing Details” section add your desired price (most common price range is $20-$50). Minimum price is $10, if you input a price lower than $10, your will not get approved. You can also add a “Compare At Price” which if applicable should be the old price that your artwork used to sell at before the discount.

2.11 Scroll to the bottom of the page and click “Save Changes”. Congratulations! Your first AI artwork has been added to your AI Art Shop ®.

3. Customising your AI Artist Profile Page
Don’t forget to customise your AI Artist profile!
3.1 Go to Profile -> My Account and then make sure all the fields with a red asterisk next to them are filled.
On the right, you also need to upload your Seller Profile picture and Seller Shop logo both of which will be shown on the front end of the website. This is quite an important step as your store logo is essentially the first thing a customer will see before deciding to visit your page and look at your art so make that first impression count! We have seen a significant amount of data that support the theory that a good looking Seller Profile picture results in more customer engagement.

3.2 In the two sections at the bottom of the Profile page you can add a short and more detailed description of your store. This is arguably the most important part of your page. This is your chance to talk about who you are as an artist, your unique artistic style, the types of algorithms you use, your journey, i.e. how you got into AI art and what inspires you.

3.3. As you can see, the more time you invest into customising your profile, the more it will stand out amongst other artists on the platform and the higher the chances that customers will notice and buy your art.

3.4 Don’t forget to share your AI Art Shop ® profile on social media so people from outside of the platform can find it too! Our team sometimes shares the most interesting AI artist profiles on our social media channels (our preferred choice is Twitter) but it is up to you to create yourself more publicity by sharing it with the world!
We hope this ‘Getting Started’ guide was a helpful introduction to the AI Art Shop ® platform and good luck with your sales!
Kind regards,
AI Art Shop Team


